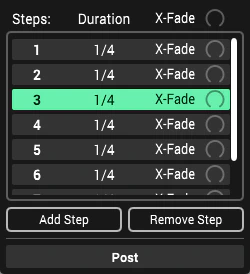
Steps
Steps are where we store control and FX settings within our presets. When editing a preset, all fixture controls will apply to the currently selected step. The control values of the current step will also be output via the DMX engine so that you can preview your changes.
Most preset’s will only use a single step in order to set control values such as colour or position. More complex presets might include multiple steps to build a sequence or chase.

Step List
The step list will always contain at least one step. Additional steps can be added as needed to create a sequence of steps.
Step Duration
We can set the duration of each step using musical timing. We can set all steps to the same duration to create a steady chase or we can vary the duration of individual steps to create a more complex sequence.
Set All Step Durations
Here’s how we can set the duration of all steps at once:
- Click on the “Duration” button at the top of the step list.
- Click on the desired duration from the pop-up menu.
Set Individual Durations
Here’s how we can set the duration of individual steps:
- Locate the step that you would like to update.
- Click on the step’s duration button.
- Click on the desired duration from the pop-up menu.
Step Crossfade
We can set the length of each step’s crossfade proportional to the step’s length. A crossfade of 0%, will cause the step to transition instantly, whereas a crossfade of 100%, will cause the step to gradually transition over the step’s entire duration.
Set All Step Crossfades
Here’s how we can set the length of all crossfades at once:
- Locate the “X-Fade” rotary slider at the top of the step list.
- Use the slider to change all crossfade values.
Set Individual Crossfades
Here’s how we can set the length of individual crossfades:
- Locate the step that you would like to update.
- Use the step’s “X-Fade” rotary slider to change the crossfade value.
Select a Step
The fixture controls in the preset editor will be assigned to whichever step is currently selected. Click on the step number to select the step for previewing or editing.
Add a Step
Click on the Add Step button to add a new step to the bottom of the list.
Remove a Step
- Select the step that you would like to remove.
- Click on the Remove Step button.
Post Step
Below the step list is an additional step called the “Post” step. This step runs after the playback has finished running.
